
Pollards: DIY coffee candle
When you get to the end of the bag of your favourite coffee beans, there is only a handful of beans left over – dilemma. There is not enough to make another pot, but they smell so good, so you don’t just want to throw them out… What’s a coffee lover to do? There are so many guides for what to do with the spent coffee grounds but what to do with the beans is another matter. Pollards has a solution… make a DIY coffee candle of course!
To make a coffee candle you will need:
- candle moulds – homemade or shop bought
- wicks
- double boiler
- wax – shop bought or you can melt down old candles to reuse
- essential oils for scent
- coffee beans – we used our Pollards Rwanda blend
Optional:
- fragrance oils
- crayons for adding colour
Choosing wax
- note that beeswax will give your candles a yellow colour
- if you don’t have any beeswax pellets laying around, you can recycle old candles. But be sure to mix and match scents carefully.
tip: you can colour the wax by adding children crayons if you so desire.
Choosing a container / candle mould
The simplest way is to purchase a candle mould from your local hobby or craft shop. But you can line any container to create a mould, by lightly greasing a tin with a spray of cooking oil. Alternatively, you can make your candles in a variety of permanent and reusable containers if you wish. Decorative tea cups, mason jars or shells are a nice touch.
Instructions
Step 1 – Chop your wax into small pieces.
This will help the wax to melt evenly and quickly.
Step 2 – Heat up your double boiler.
If you do not have a double boiler, you can easily set one up using a few pieces of kitchen equipment.
- Fill a medium-sized saucepan with a shallow layer of water. Place the saucepan onto the stove and bring the water to a boil. When the water is boiling, reduce the heat just enough so that the water maintains a continuous but relatively low boil.
- Place a large metal mixing bowl over the saucepan. The bottom of the bowl should not touch the water. You can now melt the wax in the mixing bowl without any risk of burning it.
Step 3 – Melt the wax slowly, over indirect heat.
Step 4 – Add any fragrances or colourants as desired.
We recommend a small amount of coffee-scented fragrance oil to be added and stirred into the melted wax. Brown candle coloring is optional, but can be added to give the candle an appearance to match its coffee scent.
The amounts of fragrance oil and color that you add, will depend on your own preferences regarding the intensity of the candle’s scent and colour. For the oils, please refer to the manufacturer’s directions for guidelines on how much to add.

Step 5 – Prepare the mould by inserting and securing the wick.
If your wick needs support try wrapping extra lengths of wicking around a pencil or straw, tape it or secure with bluetack. Lay the pencil/straw across the top of the mold to hold wick straight up through middle of mould.
To secure, carefully pour a small amount of wax into the mould and let this set around the base of the wick.
Step 6 – Add your coffee beans into the mould.
When you pour the wax in the beans may move around slightly so be careful not to place the beans too close to the wick in order to allow space for the flame. The beans will burn slightly if the flame comes into direct contact. Due to this, it is best for the beans to be placed around the edge of the candle. But experiment and you can have some interesting arrangements!
Another idea we will try next time will be to add a layer of just wax and coffee beans to the bottom of the candle mould. Let this dry and then place the wick above this solid layer and create a candle on top. This will create a half and half pattern with the beans, still release the scents but without the possibility of burning the beans directly.
Step 7 – Pour the melted candle wax into your mould.
Wearing oven mitts or similar thick gloves for protection. Slowly pour the melted wax from the mixing bowl into your candle mould. A slow pour will help to minimise air bubbles that will mar the appearance of the finished coffee candle.
Leave a small amount of space between the wax and the top of your mold to avoid spills.
You can add a few beans to the top of the candle for decoration if you like, before it sets completely.
Step 8 – Allow to cool.
Place the candle moulds somewhere safe and allow to cool for around 12 hours. This process many take longer in high temperatures and the size of the candle makes a difference to the setting times.
Step 9 – When the wax looks and feels dry, remove from the mould.
Step 10 – Trim the candle’s wick.
When the coffee candle has been removed from the mould, untie the wick from the support (if any). Trim the wick so that it extends about half an inch (1 cm) from the top of the candle.
–
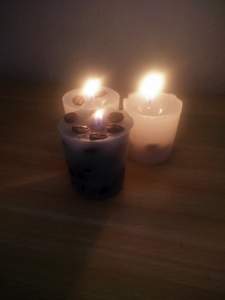
Light and enjoy safely.
We would love to see your photos! tag us on social media and you could win a prize!
Leave a Comment